How To Build A Robot At Home
How to build a robot at home starts with a small, safe project. A wheeled robot, sensor kit, or coding robot is a better first build than a full humanoid.
The starting point is usually one of two ecosystems. An assembled kit such as Makeblock mBot or a VEX Robotics kit combines assembly, sensors, and coding without the risk of a large walking robot. A from-parts build is usually based on an Arduino or Raspberry Pi controller with a chassis and sensors — see the Arduino robot kits guide and the Raspberry Pi robot kits guide for ranked picks, or the Arduino vs Raspberry Pi comparison if you have not yet chosen a controller. Vendors such as Elegoo sell complete Arduino-based robot kits to bridge the two.
The first goal should be one working behavior: follow a line, avoid obstacles, respond to a remote, or move a small object.
| Build path | Best for | Risk level |
|---|---|---|
| Wheeled kit | Beginners | Low |
| Arm kit | Manipulation learning | Medium |
| Small humanoid kit | Advanced hobbyists | Medium to high |
| Full DIY humanoid | Experienced builders | High |
Can I Build A Robot At Home?
Yes, you can build a robot at home if you choose a project that matches your tools, patience, and safety setup. Most beginners should buy a kit first — the robotics for beginners guide walks through the first-build decisions, and the best DIY robot kits for adults page ranks kits sized for hobbyist patience.
A home robot project needs a frame, motors or servos, controller, power, sensors, software, and a safe test area. For low-power, Wi-Fi-capable controllers, the ESP32 robot kits guide covers the modern alternative to Arduino. A humanoid robot adds balance and joint-control problems that are much harder than a wheeled build.
If you mainly want to own a robot, use the personal robot guide. If you want to learn, a kit is the right first move, and the robots for kids guide can help match a young builder's age to the right kit.
- Start with a low-voltage pack in the AA or 9V range for a first build, and save higher-voltage LiPo packs for later projects under adult supervision.
- Use a kit with instructions and example code.
- Keep fingers, hair, and pets away from moving joints.
- Test on the floor before adding height or weight.
- Document each change so you can undo mistakes.
Parts List For A Beginner Home Robot
A beginner wheeled robot needs a chassis, two geared motors, wheels, a motor driver, a programmable controller, a battery holder, a power switch, an obstacle sensor, jumper wires, and fasteners. Buy these as one documented kit when possible so voltage, connectors, and example code match — the where to buy robot parts guide lists the vendors that carry these subassemblies as matched sets.
You also need a small screwdriver, wire cutters, cable ties, a computer for programming, and a clear floor test area. Before you order, run the parts list through the DIY robot cost calculator so the total price does not surprise you, and if you have not yet chosen a microcontroller family, the ESP32 vs Arduino comparison covers the tradeoffs. Do not substitute a higher-voltage battery or stronger motor unless the controller, driver, wiring, and frame are rated for it.
Before assembly, label the left and right motors and photograph every connector. That simple record makes reversed wiring and loose leads easier to find.
| Part | Job | Beginner check |
|---|---|---|
| Controller | Runs the program | Supported example code and USB connection |
| Motor driver | Powers the motors | Matches motor voltage and current |
| Battery and switch | Supplies safe power | Correct polarity and enclosed cells |
| Distance or line sensor | Triggers one behavior | Documented wiring and test sketch |
| Chassis and fasteners | Holds the robot | No loose wires near wheels |
Assembly, Wiring, Code, And Test Sequence
Build the chassis first, mount the motors, and spin each wheel by hand before adding power. Next, wire the controller to the motor driver, connect one sensor, and check polarity before inserting the battery.
Upload a motor test that moves forward for one second and stops. Correct reversed motors before adding the sensor behavior, then test obstacle detection at low speed on the floor — the DIY obstacle-avoiding robot walkthrough covers ultrasonic wiring and threshold code, and the DIY line-following robot walkthrough covers the IR-array variant.
Finish with a repeatable acceptance test: ten starts, ten stops, ten obstacle detections, and a two-minute run without hot wires, loose parts, or uncontrolled motion. Disconnect power before changing wiring.
- Assemble and inspect the rolling chassis.
- Wire power with the battery disconnected.
- Test one motor, then both motors, at low speed.
- Add one sensor and verify its raw reading.
- Combine movement and sensing only after each subsystem passes.
- Record the final wiring and code before changing the design.
Humanoid Robot DIY
Humanoid robot DIY is possible, but it is not beginner-friendly. Walking, balance, power delivery, heat, falls, and hand control make the project expensive and failure-prone.
A safer path is to build small subsystems first: a gripper (see the DIY robot arm kits guide), a face display, a voice interface, a wheeled base, or a two-servo leg demo (the DIY robot dog kits guide covers full quadruped kits when you are ready). Many of those subsystem parts can be printed at home — the 3D-printed robot projects guide lists tested open designs — and if the onboard compute has to run vision, the Raspberry Pi vs Jetson Nano comparison covers the pick.
The best DIY robot is the one you can finish, debug, and improve without creating a hazard in your home.
Where To Buy
The models below are the ones we point readers at, listed in the order we would consider them. We earn a commission if you buy through these links, at no extra cost to you — it never changes which robots make the list.
ELEGOO Smart Robot Car Kit
Best first robot buildThe default first robot: chassis, motors, ultrasonic sensor, and line-following sensors with code you can actually read and change. Line following and obstacle avoidance work out of the box.
Check price on AmazonAffiliate link. Price and stock change constantly, so we show them only on Amazon.
- Uno-based chassis with motors
- Ultrasonic and line-tracking sensors
- Bluetooth and IR control
- Everything needed for the classic beginner projects
- Code is open and easy to modify
- Assembly takes a few hours
- Plastic chassis is not rugged
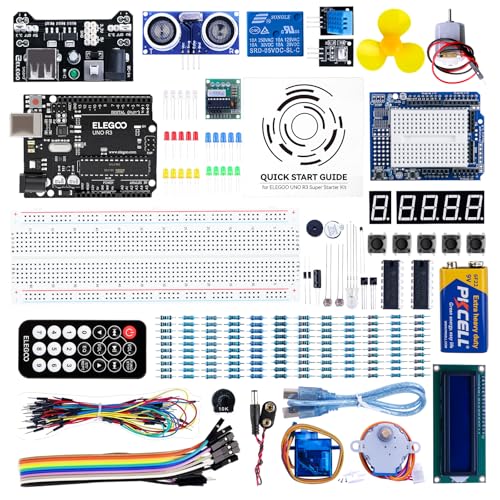
ELEGOO UNO R3 Starter Kit
Best value electronics kitThe clone alternative to the official Arduino kit: far more components for less money, with tutorials delivered as PDFs rather than a printed book.
Check price on AmazonAffiliate link. Price and stock change constantly, so we show them only on Amazon.
- Uno-compatible board plus large parts assortment
- PDF tutorials
- Breadboard and jumpers included
- Many more components per dollar
- Fully Arduino IDE compatible
- Documentation is PDF-only and rougher
- Clone board, not official support
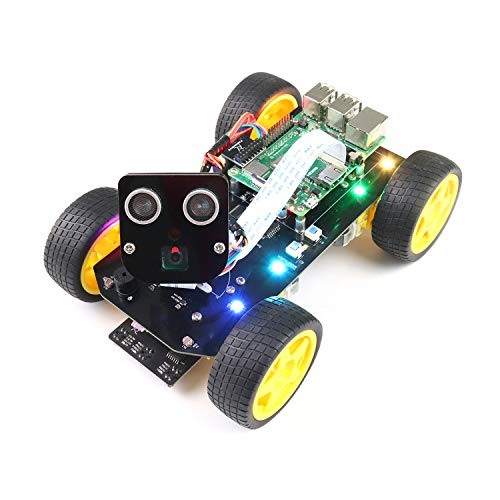
Freenove 4WD Car Kit
Best Raspberry Pi robot kitA Pi-based rover with a camera on a servo mount, so it is a vision project from day one rather than a line-follower you later try to upgrade.
Check price on AmazonAffiliate link. Price and stock change constantly, so we show them only on Amazon.
- Raspberry Pi based (Pi not included)
- Camera on pan-tilt servos
- Python tutorials included
- Camera and vision from the start
- Well-documented Python codebase
- Raspberry Pi sold separately
- Assembly is involved
Bottom Line
Building a robot at home is a great hobby when you start small. Use kits and simple behaviors before attempting humanoid robot DIY.
Pick one beginner behavior and build toward it before buying humanoid parts.
FAQs
Can I build a robot at home?
Yes, beginners can build a robot at home with a kit, simple tools, and safe low-power parts.
Can I build a humanoid robot at home?
A small humanoid-style kit is possible, but a full DIY humanoid helper is an advanced project.
What is the easiest robot to build at home?
A wheeled robot kit is usually the easiest first project because it avoids balance and high-force joint problems.
What happens if I wire the battery backward?
Reversed battery polarity can damage components or cause overheating. That risk is why the assembly sequence has builders check polarity before inserting the battery.
Primary Sources
Still deciding? Our top pick above, the ELEGOO Smart Robot Car Kit, is the one we'd point you at.